
Introduction
Are you wondering why you’re not getting full marks when asked to draw a ray diagram in your Physics examinations?
You may be missing important steps in drawing a ray diagram, so I will be sharing with you a step-by-step guide on how to draw an accurate ray diagram!
Let’s analyse this question on the topic of Light from the 2021 Clementi Town Secondary School (CTSS) S1E SA2 Examination Paper.
Alternatively, you can watch our explainer video by clicking this link.
Read Also:
Let’s Take A Look At This Light Question
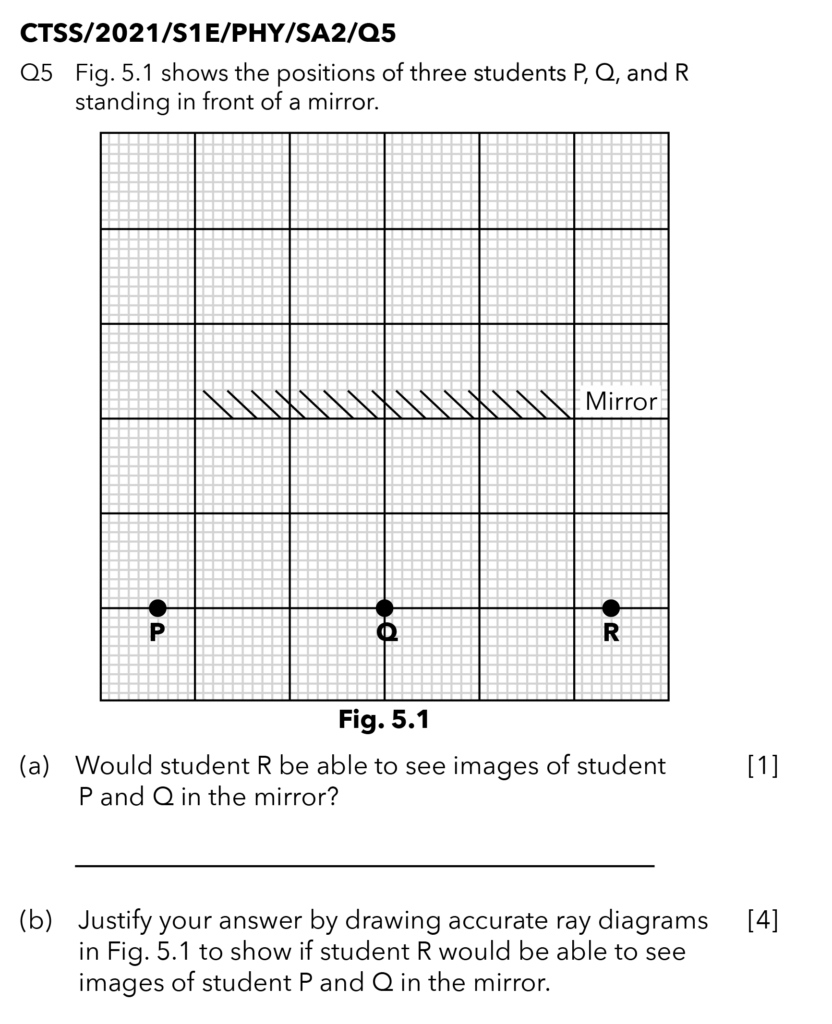
Source: Clementi Town Secondary School – 2021 S1E SA2 [Q5]
Let’s Analyse Part (A)

Source: Clementi Town Secondary School – 2021 S1E SA2 [Q5]
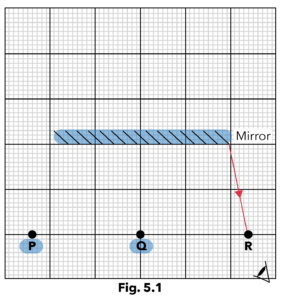
For part (a), we’re supposed to check if student R can see the images of students P and Q in the mirror.
If the question simply wants you to check which objects can be seen in the mirror in your multiple-choice questions (MCQs) or open-ended questions (OEQ), let me teach you a shortcut method you can use!
First, get a graph or plain paper, ruler, pencil, eraser, and protractor.
👥 2 Laws Of Reflection 👥
1️⃣ The incident ray, normal, and reflected ray must lie on the same plane at the point of incidence.
2️⃣ The angle of incidence must be equal to the angle of reflection.
For this plane or flat mirror, the side highlighted in blue represents the back of the mirror.

Following the first law, all the rays and the normal should be on the front side of the mirror — or the opposite side of the part we highlighted in blue.
We need to check if student R can see the images of students P and Q so let us draw an eye at R.
Should the light rays be going towards or away from the eye? The light rays should be going towards the eye of student R.

🧐 Tip To Check If Student R Can See The Images Of Students P And Q 🧐
Draw an eye and remember that for student R to be able to see the reflections of P and Q, the light rays must be heading towards it!
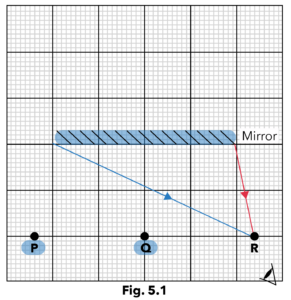
The next step in this shortcut method is to draw the reflected ray to the eye from both edges of the mirror.
Let us start at the right edge of the mirror. Don’t forget to draw the direction of the rays!
We will do the same for the other edge of the mirror.
For the next step, let us draw the normal perpendicular to the surface of the mirror. Remember to draw it dotted.
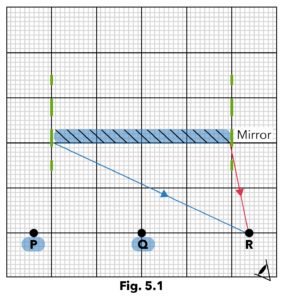
Finally, we need to draw the incident ray. Let’s recap the 2nd Law of Reflection — The angle of incidence must be equal to the angle of reflection.
🪞 Remember This When Drawing An Incident Ray 🪞
Angles are measured from the normal, and not from the surface of the mirror. So, ideally, we need to use a protractor to measure the angles to ensure that it’s equal.
But, for questions wherein we don’t need an accurate ray diagram, we can just ensure that the angles are as close to equal as possible.
Therefore, this is the best incident ray:
Let us do the same for the other edge of the mirror.
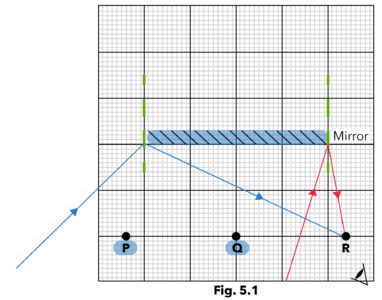
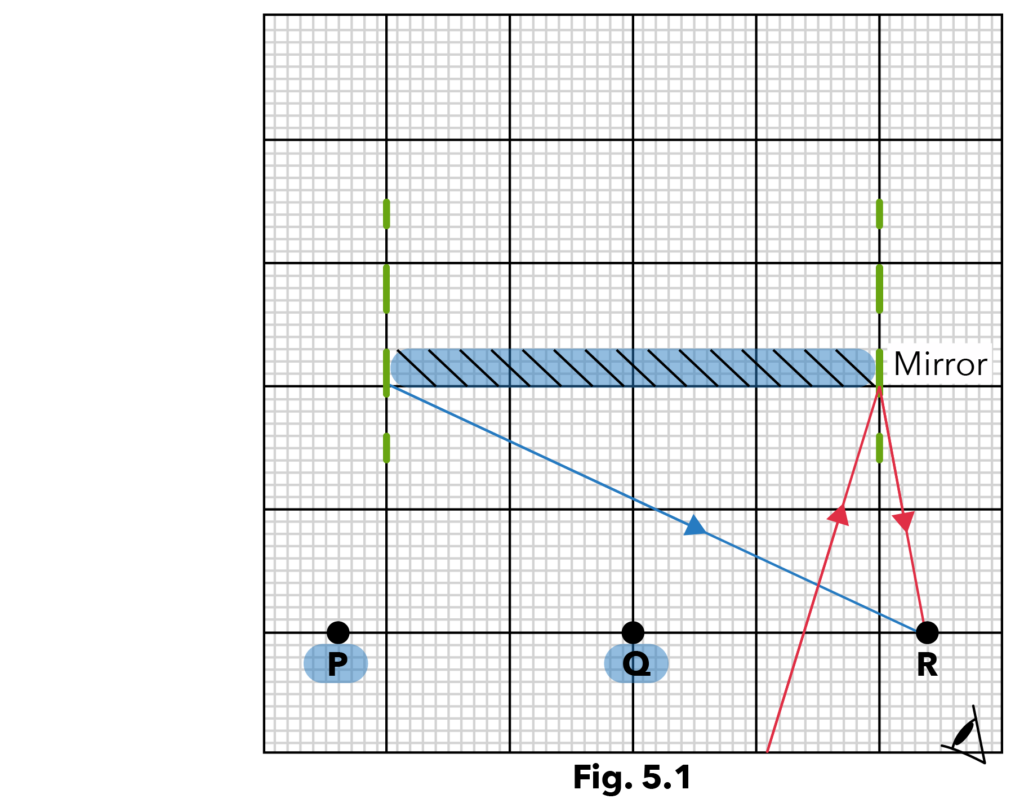
This gives us the maximum field of view that student R can observe using this plain mirror.
Let us check: Do students P and Q fall within this field of view?
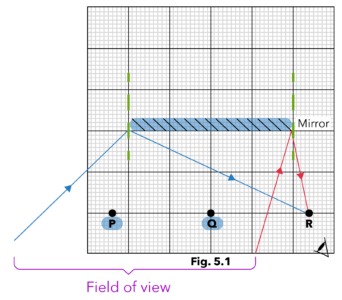
Yes, they do!
Suggested Answer For Part (A)
Yes, student R can observe the images of students P and Q in the mirror.
Let’s Analyse Part (B)

Source: Clementi Town Secondary School – 2021 S1E SA2 [Q5]
The question requires us to draw an accurate ray diagram to show that student R can see the images of students P and Q in the mirror, so we cannot use the shortcut method we did earlier.
Similarly, we cannot just draw an incident ray from P to the mirror, followed by drawing the normal, and then the reflected ray from the mirror to student R.
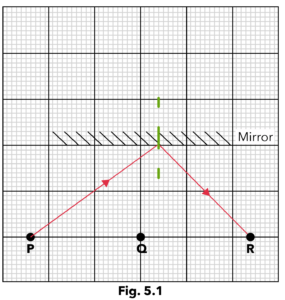
Even though we satisfy the first law, which is all the rays and the normal lying on the same plane at the point of incidence, it is difficult to ensure that we will meet the second law that the incident and reflected angles must be equal.
So, let us discard the figure above and I will show you how to do an accurate ray diagram.
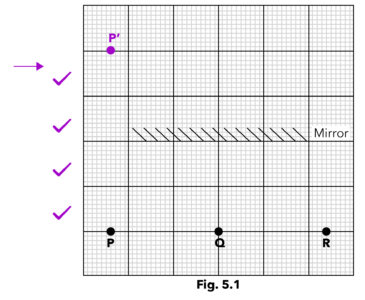
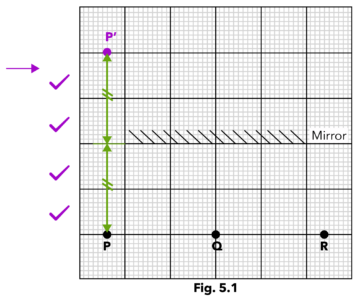
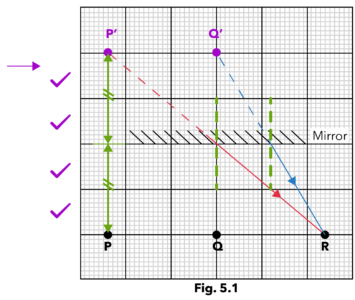
Step 1 is to draw the images of P and Q first.
Should that be in front or behind the mirror? It should be behind the mirror!
What about the distance? It must be the same distance as the object from the mirror.
If you are using graph paper, you can just count the number of boxes.
P is two large boxes in front of the mirror, so the image of P must be two large boxes behind the mirror. The image is usually labelled with an apostrophe.
But remember to check the question to find out if it is asking you to use a specific label.
However, if you are using plain paper, you need to measure the distance of the object from the front of the mirror using a ruler and make sure that the image is the same distance behind the mirror.
Remember to add these two lines to indicate that they are of equal distance.
Next, let us do the same for student Q.

Step 2 is drawing the image from the light rays from the image of student P to the eye of student R.
Since this image is not real, remember to draw the line behind the mirror dotted as shown below.
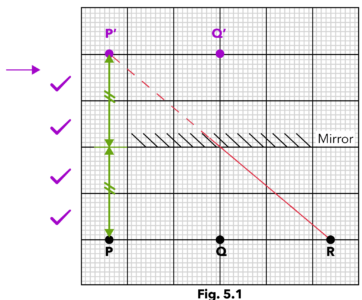
What ray have we drawn above? Is it the reflected or the incident ray? It is the reflected ray!
Next, let us do the same for Q.
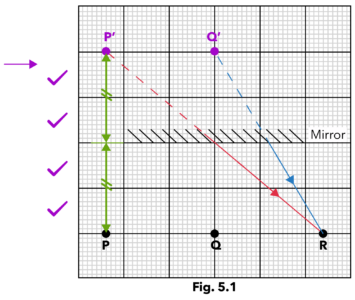
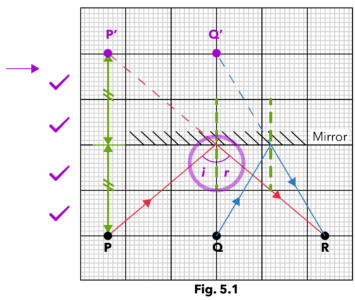
For step 3, we need to draw the normal.
🪞Remember This When Drawing The Normal🪞
The normal must be perpendicular to the surface of the mirror and it must touch both the reflected and incident rays.
 Let us do the same for Q.
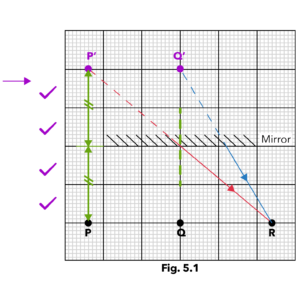
Lastly, join the incident ray from P to the mirror, where the normal is.
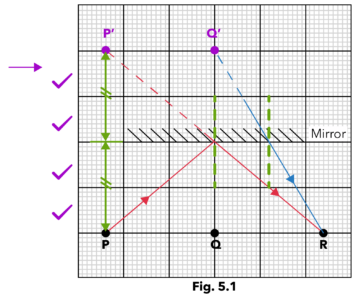
Let us do the same for Q.
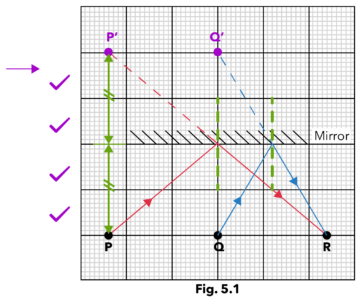
By using this method, we are ensuring that both angles are equal.
You can use a protractor to check the angles.
Remember, angles are measured from the normal and not the surface of the mirror.
Suggested Answer For Part (B)
This is how you draw an accurate ray diagram showing how student R can see the images of students P and Q.
Conclusion
Remember to follow our step-by-step guide to drawing an accurate ray diagram we discussed and you will ace your ray diagram questions!
Stay tuned for more Light blog posts!